Updating to the latest NODE and NPM

If you are already having nodejs install and you want to update to the latest version of npm and nvm than instead of getting stuck at multiple stages below is straight forward method :-
1)Check the latest version available at :-
https://nodejs.org/en/download/

2)Check version on your machine using :-
node -v
3)If your version is not latest uninstall existing node from your machine
4)Download and install latest from above url.
5)Once node is installed with latest version now go to the installed folder of node like something below:-
C:\Program Files\nodejs
from command prompt.

6:-Now install latest npm,using:-
npm install npm@latest

and you are done with it.You are now having latest node and npm available on your machine.

Directives in Angularjs

Directives are markers on a DOM element which tell AngularJS’s HTML compiler ($compile) to attach a specified behavior to that DOM element. In general most of everything is a directive in AngularJS.
AngularJS directive can be used as:-
 Element name
 Attribute
 Class
 Comment
-Life cycle of directive begins and end only under the process of bootstrapping i.e. before the page is rendered.
-Below are the four functions which executes during the life cycle of directive if those are there in directive.
a) compile :- allows the directive to manipulate DOM before it is complied and linked, during this phase it modify the DOM and directives i.e. by adding removing and changing.
b)Controller :- controller provides the communication. Sibling and child controller can request for information to their siblings and parent’s controller.
c) pre-link :- Within this function manipulation with $scope is done(if any) so that the manipulated scope can be used in post-link function.
d) post-link : – This is the method which performs most of the work of the directive.
So if all four functions are used then structure will be something like below:-

.directive("mydirective",function () {
return {
controller: function() {
//code for controller.
},
compile:{
// compile related code.
return {
pre: function() {
// code for pre-link.
},
post: function() {
// code for post-link.
}
};
}
}
})

Signature for both i.e. pre and post link are same, the main difference is in the order those are executed. In general you will be not seeing more usage of pre-link function. Mostly controller and post-link are enough for handing basic purpose of a directive. In those case ‘link’ will be simply referring to the ‘post-link’.

.directive("mydirective",function () {
return {
controller: function() {
//code for controller.
},
link: function() {
// code for post-link.
}
}
})

Below is the sample code for creating a custom directive. In this directive things are very simple and only link method is being used. The thing to notice here is that we are not using the ‘$scope’ inside the link function, instead we are using scope which is called ‘isolated scope’.

index.html:-

<html>
   <body>
<div ng-app="mainApp">
	     Enter Percentage :- <input ng-model="percentage"></input>

	    <percentage-dir value="percentage" ng-init="percentage = 15"></percentage-dir></div>
<script src ="//ajax.googleapis.com/ajax/libs/angularjs/1.5.6/angular.min.js"></script>

    <script>
        var mainApp = angular.module('mainApp', []);
        
		  mainApp.directive("percentageDir", function (){
		    return {
		        restrict: 'E',
		        scope: {
		            value: '=',
		        },
		        templateUrl: 'directivetemplates/percentageTemplate.html',
		        link: function(scope, element, attrs) {
		           element.on('click', function () {
	                  alert('You cannot write Here.');
	               
	              });
		           scope.canvas = element.find('canvas')[0];
		           scope.context = scope.canvas.getContext('2d');
		 
		           scope.$watch('value', function(currentValue) {
		             fillWidth = Math.ceil(currentValue / 100 * scope.canvas.width);
		             scope.context.fillStyle = "#cccccc";
		             scope.context.fillRect(0, 0, scope.canvas.width, scope.canvas.height);
		             scope.context.fillStyle = "#0000FF";
		             scope.context.fillRect(0, 0, fillWidth, scope.canvas.height);
		           });
		        }        
		    };
		});
      </script>
</body>
</html>

directivetemplates/percentageTemplate.html:-

<canvas width='200' height='30' style="border-style: solid;border-width: 2px">
</canvas>

Hope this will be helpfull to someone.

CSS3 Flexible Box Layout Mode

Flexbox or Flexible Box Layout i.e. :-
https://www.w3.org/TR/css-flexbox/

is layout module in css3 implemented to improve the items align,direction,order and dynamic size.The purpose of this is to utilize the space of container with maximum possible ways,which makes it usable for different screen sizes.Also known issue of handling vertically align ‘Div’ is quite easy and simple with this approach.

With just few properties you will be able to get any kind of layout with CSS3.
We will require to just style parent container and child container with below mentioned properties:-

1)For Flex Container:-
a)display: flex | flex-wrap
For defining type of container.

b)flex-direction = row(default) | row-reverse | column | column-reverse;
Used for setting direction of items inside a flex container.

c)align-items: flex-start | flex-end | center | baseline |stretch (default)
Horizontally/Vertically aligns the flex items when there is additional space inside container other than the item’s dimension.It will work horizontally or vertically is decided on the ‘row’ or ‘column’ value of ‘flex-direction’.

d)justify-content: flex-start | flex-end | center | baseline |stretch (default)
Horizontally/Vertically aligns the flex items when there is additional space inside container other than the item’s dimension.It will work horizontally or vertically is decided on the ‘row’ or ‘column’ value of ‘flex-direction’.And this will be work on the other dimension, which is controlled by ‘align-items’.

2)For Item container:-
align-self : flex-start | flex-end | center | baseline |stretch (default)
‘align-self’ will override the ‘align-items’ of the parent container.

Attaching a sample code of html page below.In this we have align 3 divs inside a div horizontally and vertically center.
If you will open the commented code of Item’s style then you will see how the ‘align-self’ of item will overide the ‘align-items’ of parent container.

<!DOCTYPE html>
<html>
<head>
<style>

.fcontainer {
    display: flex;
    flex-direction: row;

  	align-items: center;
  	justify-content: center;

    width: 1000px;
    height: 800px;
    background-color: #eeeeee;
}

.fitem1 {
	/*align-self:center;*/

	text-align: center;
    background-color: #cccccc;
    width: 200px;
    height: 200px;

    margin: 10px;
    border-width: 5px;
    border-color: #000000;
    padding: 10px;
}

.fitem2 {
	/*align-self:flex-end;*/

	text-align: center;
    background-color: #cccccc;
    width: 200px;
    height: 200px;

    margin: 10px;
    border-width: 5px;
    border-color: #000000;
    padding: 10px;
}

.fitem3 {
	/*align-self:flex-start;*/

	text-align: center;
    background-color: #cccccc;
    width: 200px;
    height: 200px;

    margin: 10px;
    border-width: 5px;
    border-color: #000000;
    padding: 10px;
}
</style>

</head>
<body>
<div class="fcontainer">
<div class="fitem1">Div 1</div>
<div class="fitem2">Div 2</div>
<div class="fitem3">Div 3</div>
</div>
</body>
</html>

This will also work fine if you will providing the dimensions in percentage.
Hope this will hope full for someone.

Centering a div inside a div horizontally and vertically

There are multiple ways of achieving this but none of them is 100% perfect.Making a ‘div’ center horizontally and vertically inside another ‘div’ with CSS is bit tricky.One thing to mention is that if you want to achieve this just by css then you will require to provide the hard coded dimensions of the ‘div’.
The best way as per my understanding is as below:-

<html>
  <style>
	.containerDiv {
	     width : 400px;	
	     height: 300px;
	     
	     display: table-cell;
	     vertical-align:middle;	
	     text-align:center;
		 
	     /*Optional:-Just for Demo UI*/
	     background-color: #eeeeee;
	     border-color: #000000;
	     border-style: solid;
	     border-width: 4px;
	}
	.contentDiv {
	    
	    display: inline-block;
	    width : 200px;	
	    height: 150px;
	    
	    /*Optional:-Just for Demo UI*/
	    background-color: #bbbbbb;
	    border-color: #0000ff;
	    border-style: solid;
	    border-width: 2px;
	}
	</style>
    <body>
	<div class="containerDiv">
		<div class="contentDiv">		 
			Horizontally and Vertically Center Div.
		</div>
	</div>
    </body>
</html>

Hope this will helpful for someone.

Class in ECMAScript 6.0

As JavaScript is a prototype based object oriented language so we were require to do simulation for creating class in javascript. But ECMAScript 6 defines classes in actual by introducing the ‘class’ keyword.Before ECMAScript 6.0 how to create a class in javascript we have seen in:-
https://smartfrontend.wordpress.com/2016/05/29/creating-class-in-javascript/

But with ECMAScript 6.0 there is clean way for defining the class in javascript.Writting same class as in above mentioned link in ECMAScript 6.0.Below is code for creating class with name ‘Company’:-


class Company {
	//Define Constructor of Class.
    constructor(name,yearOfFoundation,noOfEmployee){
        this.name = name;
        this.yearOfFoundation = yearOfFoundation;
        this.noOfEmployee = noOfEmployee;
    }

    getCompanyInfo() {
        return this.name + ' ' + this.yearOfFoundation + ' '+ this.noOfEmployee;
    }
}

We can create the object of this class as :-


  //Creating Instance of Company.
  var company = new Company('Comp1','1997','1000');

  //calling method of instance.
  var str = company.getCompanyInfo();

Hope this will be helpful for someone.

Creating Class In JavaScript

As in java script there was no any keyword like ‘Class’ up-to ECMAScript 6.But still there was scope of creating a class.Let See how it was achieve. This can be done most commonly using the normal JavaScript function and then creating Object of this by using the ‘new’ keyword.For defining the methods and properties of an object created using the function() we use the ‘this’ keyword.With the all below sample codes we will be create a class name ‘Company’ with certain properties and one method.

Below is code for creating class with name ‘Company’ :-

function Company (name,yearOfFoundation,noOfEmployee) {
    this.name = name;
    this.yearOfFoundation = yearOfFoundation;
    this.noOfEmployee = noOfEmployee;
    this.getCompanyInfo = getCompanyInfo;
}
 
function getCompanyInfo() {
    return this.name + ' ' + this.yearOfFoundation + ' '+ this.noOfEmployee;
}

We can create the object of this class as :-

//Creating Instance of Company.
var company = new Company('Comp1','1997','1000');
//calling method of instance.
var str = company.getCompanyInfo();

With the above approach there is additional way of defining the method which will be inside the function it self.In that case the above written class will be defined as :-

function Company (name,yearOfFoundation,noOfEmployee) {
    this.name = name;
    this.yearOfFoundation = yearOfFoundation;
    this.noOfEmployee = noOfEmployee;
    this.getCompanyInfo = function(){
    	return this.name + ' ' + this.yearOfFoundation + ' '+ this.noOfEmployee;
    };
}

Creating the object of class will be still same as earlier i.e. :-

//Creating Instance of Company.
var company = new Company('Comp1','1997','1000');
//calling method of instance.
var str = company.getCompanyInfo();

Other than above approach of defining methods below is one more approach i.e. by adding method to prototype.Below is code sample for the same :-

function Company (name,yearOfFoundation,noOfEmployee) {
    this.name = name;
    this.yearOfFoundation = yearOfFoundation;
    this.noOfEmployee = noOfEmployee;
}

Company.prototype.getCompanyInfo = function(){
    	return this.name + ' ' + this.yearOfFoundation + ' '+ this.noOfEmployee;
    };

Creating the object of class will be still same as both the earlier cases i.e.:-

//Creating Instance of Company.
var company = new Company('Comp1','1997','1000');
//calling method of instance.
var str = company.getCompanyInfo();

Hope this will be helpful to someone.

CRUD Operations in AngularJS Using Factory Method

As we have worked on the CRUD operations in AngularJS in previous post i.e.:-
https://smartfrontend.wordpress.com/2016/03/23/curd-operations-in-angularjs/

With that post you have seen that we were getting/posting data directly from the controllers.
Today I am writting the same functionality using the services by using factory method.In this post I am keeping the service and controller in separate files,which is needed when you are working with realistic application.So lets go step by step.

index.html:-

<!DOCTYPE html PUBLIC "-//W3C//DTD XHTML 1.0 Transitional//EN" "http://www.w3.org/TR/xhtml1/DTD/xhtml1-transitional.dtd">
<html xmlns="http://www.w3.org/1999/xhtml">
<head>
    <title>CRUD Operations in AngularJS Using Factory Method</title>

    <script src="//ajax.googleapis.com/ajax/libs/angularjs/1.4.7/angular.min.js"></script>
	<script src="//ajax.googleapis.com/ajax/libs/angularjs/1.4.7/angular-route.min.js"></script>

    <script src="app.js" type="text/javascript"></script>
    <script src="controller.js"></script>
    <script src="crudFactory.js"></script>
</head>
<body data-ng-app="crudFactoryApp" >
<h1>Using Factory Method for CURD Operations</h1>
<ng-view>
	</ng-view>
</body>
</html>

app.js:-

var crudFactoryApp = angular.module('crudFactoryApp', []);

angular.module('crudFactoryApp', [
  'crudFactoryApp.controller',
  'crudFactoryApp.crudFactory',
  'ngRoute'
]).
config(['$routeProvider', function($routeProvider) {
  $routeProvider.
	//when("/", {templateUrl: "partials/home.html", controller: "companyController"}).
	otherwise({templateUrl: "partials/home.html", controller: "companyController"});
}]);

controller.js:-

angular.module('crudFactoryApp.controller', []).

   /* Company controller */
  controller('companyController', function($scope, crudAPIFactory) {
	$scope.createCompany = function(Company)
    {
    		//Insert new Company.
    	 	crudAPIFactory.createCompany(Company).success(function (response) {
		        crudAPIFactory.getCompanyList().success(function (response) {
		        	$scope.Companies = response.data;
		    	});
	        	$scope.clearUI();
    	});
    };

    $scope.getCompany = function(Company)
    {
    	//Get Company.
    	 	crudAPIFactory.getCompany(Company).success(function (response) {
    	 		$scope.Company = response.data;
    	});
    };

    $scope.updateCompany = function(Company)
    {
    	//Update Company.
    	crudAPIFactory.updateCompany(Company).success(function (response) {
    			 crudAPIFactory.getCompanyList().success(function (response) {
		        	$scope.Companies = response.data;
		    	});
	        	$scope.clearUI();
    	});
    };

   $scope.deletecompany = function(Company)
    {
     	//Update Company.
    	crudAPIFactory.deletecompany(Company).success(function (response) {
    			 crudAPIFactory.getCompanyList().success(function (response) {
		        	$scope.Companies = response.data;
		    	});
    	});
    };

    //Get Company List
    crudAPIFactory.getCompanyList().success(function (response) {
        $scope.Companies = response.data;
    });

   $scope.clearUI = function() {
        $scope.Company.companyId = "";
        $scope.Company.name = "";
        $scope.Company.ceo = "";
        $scope.Company.country = "";
        $scope.Company.foundationYear = "";
        $scope.Company.noOfEmployee = "";
    };

  });

crudFactory.js:-

angular.module('crudFactoryApp.crudFactory', [])
  .factory('crudAPIFactory', function($http) {

    var crudFactory = {};

    //Get Company List
    crudFactory.getCompanyList = function() {
      return $http({
            url: "http://localhost:8080/SpringMavenRestDemoService/getcompanyall/",
            method: 'GET'
           });
    };

    //Insert new Company.
    crudFactory.createCompany = function (Company) {
      return $http({
            url: 'http://localhost:8080/SpringMavenRestDemoService/createcompany/',
            method: 'POST',
            data : Company
        });
    };

    //Get Company.
    crudFactory.getCompany = function (Company) {
      return  $http({
        url: "http://localhost:8080/SpringMavenRestDemoService/getcompany/" + Company.companyId,
        method: 'GET',
    });
    };

    //Update Company.
     crudFactory.updateCompany = function (Company) {
          return  $http({
            url: 'http://localhost:8080/SpringMavenRestDemoService/updatecompany/',
            method: 'POST',
            data : Company,
        });
        };

    //Delete Company.
    crudFactory.deletecompany = function (Company) {
     return  $http({
            url: 'http://localhost:8080/SpringMavenRestDemoService/deletecompany/'+ Company.companyId,
            method: 'GET',
        });
    };    

    return crudFactory;
  });

partials/home.html

<h1>Company Details</h1>
<form name="companyForm">
<table>
<tr>
<td>
                    CompanyName</td>
<td>
                    CEO</td>
<td>
                    Country</td>
<td>
                	FoundationYear</td>
<td>
                	NoOfEmployee</td>
</tr>
<tr data-ng-repeat="comp in Companies">
<td>
                    {{comp.name}}</td>
<td>
                    {{comp.ceo}}</td>
<td>
                    {{comp.country}}</td>
<td>
                    {{comp.foundationYear}}</td>
<td>
                    {{comp.noOfEmployee}}</td>
<td>
                    <input type="submit" id="Edit" value="Edit" data-ng-click="getCompany(comp)"/></td>
<td>
                    <input type="submit" id="Delete" value="Delete" data-ng-click="deletecompany(comp)"/></td>
</tr>
<tr>
<td>
                   Company Name</td>
<td>
                    <input type="text" data-ng-model="Company.name" required /></td>
</tr>
<tr>
<td>
                    CEO</td>
<td>
                    <input type="text" data-ng-model="Company.ceo" /></td>
</tr>
<tr>
<td>
                    Country</td>
<td>
                    <input type="text" data-ng-model="Company.country" /></td>
</tr>
<tr>
<td>
                    FoundationYear</td>
<td>
                    <input type="text" data-ng-model="Company.foundationYear" /></td>
</tr>
<tr>
<td>
                    NoOfEmployee</td>
<td>
                    <input type="text" data-ng-model="Company.noOfEmployee" /></td>
</tr>
<tr>
<td></td>
<td>
                    <input type="submit" value="Save" data-ng-click="createCompany(Company)" data-ng-disabled="companyForm.user.$dirty && companyForm.user.$invalid ||  					 companyForm.Company.name.$dirty && companyForm.Company.name.$invalid"/>
                    <input type="submit" value="Update" data-ng-click="updateCompany(Company)"/>
                    <input type="reset" value="Clear"/></td>
</tr>
</table>
</form>

Hope this will be useful for someone.

CRUD Operations in AngularJS

Attaching below sample application for Insert/Update/Delete operations in a angularJS application.I hope by just code you will able to see how to consume web services of CRUD operations in angularjs. You will require to configure the service urls as per your own for running this sample application.Below is source code of application.

index.html:-

<!DOCTYPE html PUBLIC "-//W3C//DTD XHTML 1.0 Transitional//EN" "http://www.w3.org/TR/xhtml1/DTD/xhtml1-transitional.dtd">
<html xmlns="http://www.w3.org/1999/xhtml">
<head>
<title>CRUD Operations in AngularJS</title>

<script src="//ajax.googleapis.com/ajax/libs/angularjs/1.4.7/angular.min.js"></script>
 <script src="//ajax.googleapis.com/ajax/libs/angularjs/1.4.7/angular-route.min.js"></script>

<script src="app.js" type="text/javascript"></script>
</head>
<body data-ng-app="crudSampleApp" data-ng-controller="CompanyController">
<h1>Company Details</h1>
<form name="companyForm">
<table>
<tr>
<td>
CompanyName</td>
<td>
CEO</td>
<td>
Country</td>
<td>
FoundationYear</td>
<td>
NoOfEmployee</td>
</tr>
<tr data-ng-repeat="comp in Companies">
<td>
{{comp.name}}</td>
<td>
{{comp.ceo}}</td>
<td>
{{comp.country}}</td>
<td>
{{comp.foundationYear}}</td>
<td>
{{comp.noOfEmployee}}</td>
<td>
<input type="submit" id="Edit" value="Edit" data-ng-click="getCompany(comp)"/></td>
<td>
<input type="submit" id="Delete" value="Delete" data-ng-click="deletecompany(comp)"/></td>
</tr>
<tr>
<td>
Company Name</td>
<td>
<input type="text" data-ng-model="Company.name" required /></td>
</tr>
<tr>
<td>
CEO</td>
<td>
<input type="text" data-ng-model="Company.ceo" /></td>
</tr>
<tr>
<td>
Country</td>
<td>
<input type="text" data-ng-model="Company.country" /></td>
</tr>
<tr>
<td>
FoundationYear</td>
<td>
<input type="text" data-ng-model="Company.foundationYear" /></td>
</tr>
<tr>
<td>
NoOfEmployee</td>
<td>
<input type="text" data-ng-model="Company.noOfEmployee" /></td>
</tr>
<tr>
<td></td>
<td>
<input type="submit" value="Save" data-ng-click="createCompany(Company)" data-ng-disabled="companyForm.user.$dirty && companyForm.user.$invalid ||
companyForm.Company.name.$dirty && companyForm.Company.name.$invalid"/>
<input type="submit" value="Update" data-ng-click="updateCompany(Company)"/>
<input type="reset" value="Clear"/></td>
</tr>
</table>
</form>
</body>
</html>

app.js:-

var crudSampleApp = angular.module('crudSampleApp', []);

crudSampleApp.controller('CompanyController', ['$scope', '$http',function($scope, $http){

angular.element(document).ready(function () {
$scope.getCompanyList();
});

//Get Company List
$scope.getCompanyList = function()
{
$http({
url: "http://localhost:8080/SpringMavenRestDemoService/getcompanyall/",
method: 'GET',
headers: { 'Content-Type': 'application/json;charset=utf-8' },
dataType : "JSONP",
}).then(function (data) {
$scope.Companies = data.data.data;
}).catch(function (e) {
$scope.error = e +"Unable to load company list.";
});
};

//Get Company.
$scope.getCompany = function (Company) {
$http({
url: "http://localhost:8080/SpringMavenRestDemoService/getcompany/" + Company.companyId,
method: 'GET',
headers: { 'Content-Type': 'application/json;charset=utf-8' },
dataType : "JSONP",
}).then(function (data) {
$scope.Company = data.data.data;
}).catch(function (e) {
$scope.error = e +"Unable to load company.";
});
};

//Insert new Company.
$scope.createCompany = function (Company) {
$http({
url: 'http://localhost:8080/SpringMavenRestDemoService/createcompany/',
method: 'POST',
data : Company,
headers: { 'Content-Type': 'application/json;charset=utf-8' },
dataType : "JSONP",
}).then(function (data) {
alert("Company added successfully.");
$scope.getCompanyList();
clearUI();
}).catch(function (e) {
$scope.error = e +"Unable to add company.";
});
};

//Update Company.
$scope.updateCompany = function (Company) {
$http({
url: 'http://localhost:8080/SpringMavenRestDemoService/updatecompany/',
method: 'POST',
data : Company,
headers: { 'Content-Type': 'application/json;charset=utf-8' },
dataType : "JSONP",
}).then(function (data) {
alert("Company updated successfully.");
$scope.getCompanyList();
clearUI();
}).catch(function (e) {
$scope.error = e +"Unable to update company.";
});
};

//Delete Company.
$scope.deletecompany = function (Company) {

$http({
url: 'http://localhost:8080/SpringMavenRestDemoService/deletecompany/'+ Company.companyId,
method: 'GET',
headers: { 'Content-Type': 'application/json;charset=utf-8' },
dataType : "JSONP",
}).then(function (data) {
alert("Company deleted successfully.");
$scope.getCompanyList();
clearUI();
}).catch(function (e) {
$scope.error = e +"Unable to delete company.";
});
};

function clearUI() {
$scope.Company.companyId = "";
$scope.Company.name = "";
$scope.Company.ceo = "";
$scope.Company.country = "";
$scope.Company.foundationYear = "";
$scope.Company.noOfEmployee = "";
};

}]);

Hope this will help someone.

“No ‘Access-Control-Allow-Origin’ header is present on the requested resource”

You may get this kind of message when you will be trying to access any rest web service from external server.Your message should be something like:-

XMLHttpRequest cannot load http://Your Service url. No ‘Access-Control-Allow-Origin’ header is present on the requested resource. Origin ‘http://Your Service requesting url’ is therefore not allowed access.

The reason for this is that a XMLHttpRequest is being made to a different domain from the domain in which your page is available.Though you will be able to access this service using the postman.This security mechanism is known as ‘Cross-Origin Resource Sharing‘(CORS).

You can read about this in detail from:-
https://www.w3.org/TR/cors/

So for out-coming from this issue we will require to add CORS support on our server i.e. on the server where our web-service is residing.According to your server you can configure your server as per below link:-

http://enable-cors.org/server.html

After making changes as per above link you should now be able to access the web-service from the mentioned server.

Hope this will helpful for someone.

Difference between $routeProvider and $urlRouterProvider

If you are not very experienced with angularjs than you will be probably confused with uses of “$routeProvider” and ‘$urlRouterProvider‘.In multiple sample applications over the internet you will find that out of these two,only one is being used.

Module name for ‘$routeProvider’ is ‘ngRoute’ for ‘$urlRouterProvider’ it is ‘ui.router‘.
ui.router is a third party,you can check below url for details of ‘$urlRouterProvider‘:-

https://github.com/angular-ui/ui-router/wiki/URL-Routing#urlrouterprovider

‘ngRoute’ takes care of urls for routing while ‘ui-router’ takes cares of ‘states’ additionally other than urls.States will be helpfull for making nested and complex views.One can even pass information between states with the help of ‘$stateParams’.

In ‘ngRoute’ you write links as:-

  <a href="">

But in ‘ui-router’ links are generally written as:-

  <a ui-sref="">

though

  <a href="">

will also work fine.

For simple application used ‘ngRoute’ and for complex UI based larger applciations use ‘ui-router’.

So ‘ui-router’ provides all features which are there in ‘ngRoute’ plus multiple additional feature which are good for a large application.

Hope this will helpful for someone.

Unable to Install Aptana Studio 3.6.1 on Windows 7 32 Bit.

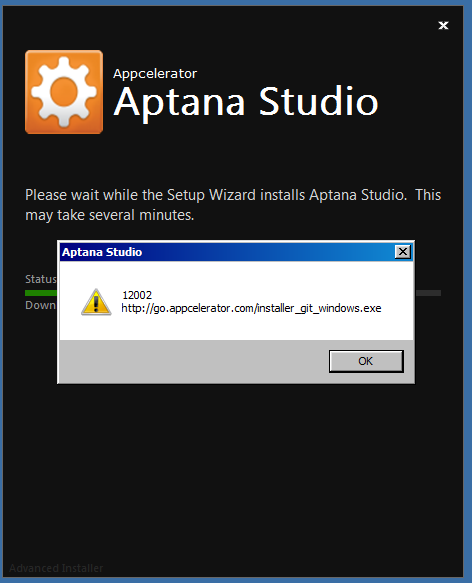
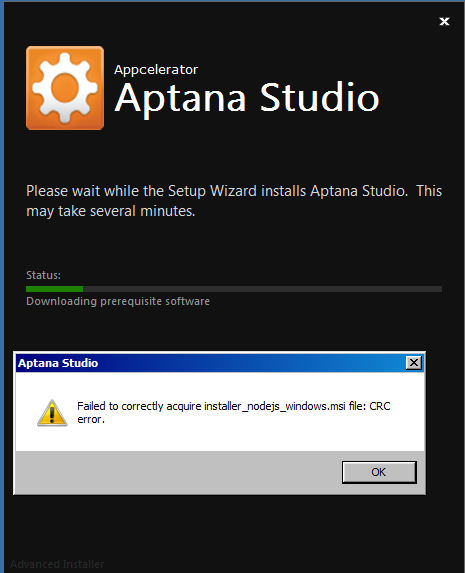
During installation of Aptana Studio you may get this problem.Attaching the problem screen shot below:-


aptana1
The Aptana studio installer at my end is “Aptana_Studio_3_Setup_3.6.1.exe”.The

error message is :-

Failed to correctly acquire installer_nodejs_windows.msi file:CRC

For this you will require to install the node js from link below:-

http://go.aptana.com/installer_nodejs_windows

If you are having nodejs on your machine than uninstall that.The reason for this is that above mentioned version of Aptana Studio will work with the version which is available on the link only.

Now again you may get error like below:-

aptana2

So better to install:-
GIT from link below:-

http://go.appcelerator.com/installer_git_windows.exe

After installing these two items now you will be able successfully install Aptana studio.

Hope this will be help full for someone.

AngularJS Development with Grunt, Bower and Yeoman

In this sample application tutorial we will be using multiple tools for different purpose for an AngularJS application development. Let’s just know about their names and purpose.

Karma:-Karma is a test runner tool for JavaScript which runs on Node JS.

Jasmine:-Behavior-driven development framework for testing JavaScript code. It does not depend on any other JavaScript framework.

Grunt:-Grunt is JavaScript Task Runner.

Bower:-Bower is a package manager for web which manages multiple components like html, JavaScript, css, images etc.

Yeoman:-Yeoman is an open source client-side development stack, consisting of tools and frameworks intended to help developers quickly build high quality web applications. This contains Grunt, Bower, and the scaffolding tool Yo. Yo generates boilerplate code with the help of generators.

I am using Aptana Studio (http://www.aptana.com/) as my IDE for this sample tutorial. And have also tested this sample with Eclipse IDE. Now let’s move step by step towards creating our sample application using above tools.

Step 1:– First of all install below three tools which are backbone for your further tools.
a)GIT (https://git-scm.com/)
b)NodeJs (https://nodejs.org/en/download/)
b)NPM :-Once you have installed npm you can update it using:-
npm install npm –g
and you can check the version of it using :-
npm –v

Now here is one important point to note.As I am using Aptana Studio as IDE so I am just creating the new Project of Default type with name ‘YourApplicationName’ so that my terminal will be open for this project only. Then I will open my terminal so that all structure will apply to this application only.

Step 2:-
a) Install yeoman, grunt and bower all together by using yo.
npm install -g yo grunt-cli bower

b) Install Angular generator.
npm install -g generator-angular

Step 3:-For Scaffolding Angular App run command below.
a) yo angular

Now you will be asked for multiple yes and no options.Include whatever you want to add and want to leave in your application.E.g. I am just selecting bootstrap and angular-route.js.

Now after finishing the processing of Step 3 you will able to see you application folder full of the multiple files and folders.You will able to see ‘app’ directory there which contains html, css and JavaScript and inside this only we will be doing our development.

Now below is Step 4 for installing Testing Tools. We will be talk on using these later on someday. So you Can avoid this step for right now and Directly jump to Step 5.

Step 4:-
a)npm install karma-jasmine –save-dev
b)npm install karma-chrome-launcher –save-dev

Step 5:- Running the application.Just type below command:-
grunt serve

Application will run in ur browser.I will be update this post soon for the Step 4.


Hope this post will helpful to someone.

Controller to Controller Communication in AngularJS by Injecting Service

In our angular based application certain times we may require to communicate between two or more controllers for just informing about any event or for sharing/passing data.Due to nature of Single Page and Rich Internet Application this is too much general in angular application.

The approach which we will be discussing is based on two things:-
i)$broadcast :- This will broadcast any event in entire application.
ii)Injecting a common service which will be shared between two or more controllers.

In our sample application we are having two controllers which are associated to two divs.We are naming those ‘LeftController’ and ‘RightController’.Both of them are defined inside ‘app.js’.We have also created a service using .factory().

In sample application you will find that from the ‘LeftController’ we are passing what ever text we want to write and it is being found by ‘RightController’ using shared service.

Attaching code snippet for same with ‘index.html’ and ‘app.js’.

index.html:-

<!DOCTYPE html>
<html>
<head>
    <script src="//code.angularjs.org/1.2.20/angular.js"></script>
    <link href="http://maxcdn.bootstrapcdn.com/bootstrap/3.3.5/css/bootstrap.min.css" rel="stylesheet">
    <script src="app.js"></script>
 </head>   
 
<body style="padding-top: 100px">
     
    <div class="container" ng-app="myApp" align="middle">
        <div class="row" align="center"  >
             
            <div  class="col-md-4" ng-controller="LeftController" style="background-color: #BBBBBB">
                 <input ng-model="modelMsg" style="width: 300px" >
                 <button ng-click="onLeftClick(modelMsg);">Left Controller(Send Message From Here).</button>
            </div>
 
            <div  class="col-md-4">
                <h4>Controller to Controller Communication in AngularJS  by Injecting Service</h4> 
            </div>
             
            <div class="col-md-4" ng-controller="RightController" style="background-color: #BBBBBB">
                <input ng-model="modelMsg" style="width: 300px" >
                <label>Right Controller will Receive Message.</label>
            </div>
             
       </div>
    </div>
     
<body>
</html> 

app.js:-

var myApp = angular.module('myApp', []);
 
myApp.factory('appSharedService', function($rootScope) {
 
    var communicationService = {};
    communicationService.message = '';
 
    communicationService.prepareBroadCastStatment = function(msg) {
        this.message = msg;
        this.dispatchBroadCast();
    };
 
    communicationService.dispatchBroadCast = function() {
        $rootScope.$broadcast('customEvent');
    };
     
    return communicationService;
});
 
//Left Controller.
function LeftController($scope, sharedService) {
    $scope.onLeftClick = function(msg) {
        sharedService.prepareBroadCastStatment(msg);
    };
}
 
//Right Controller.
function RightController($scope, sharedService) {
     $scope.$on('customEvent', function() {
        $scope.modelMsg = sharedService.message;
    });      
}
 
//Injecting shared service in both the controllers.
LeftController.$inject = ['$scope', 'appSharedService'];        
RightController.$inject = ['$scope', 'appSharedService'];

Hope this will help someone.

Posting JSON data to Server Using RESTful service in AngularJS

This is related to just demonstrating posting of data to server in a simple case.If we are not using ‘factory’in our application then we can post data to server by simply putting code inside the controller.
Inside your controller create a method namely submitToServer or what ever you want to name it,like below:-

$scope.submitToServer = function(){
	$http({
	url: urlOfService,
	method: 'POST',
	data: {
			id : $scope.emp.name,
			name: $scope.emp.name,
			age: $scope.emp.age,
			phoneNumber: $scope.emp.phoneNumber,
			street: $scope.emp.street,
			city: $scope.emp.city,
			state: $scope.emp.state
		  },
	headers: { 'Content-Type': 'application/json;charset=utf-8' },
	dataType : "JSONP",
	//timeout: 1,
	//cache: false,
	//transformRequest: false,
	//transformResponse: false
	}).then(function (results) {
		alert("Data Posted Successfully.");
		$scope.getDataFromServer();
	}).catch(function (e) {
			alert(e +" Exception In Posting Data");
			});
	}
  };
}

Now inside your module you can call this method as below in click of any button:-

<button ng-click="submitToServer()">Submit To Server</button>

Please note that all data which we are sending is inside ‘data’ node only.

Hope This will Help Someone.

Executing function inside Controller On Document/Module Ready In AngularJS

Some times there are scenarios when you want to Run any function inside the controller without any user interaction.
For handling of this case we use :-
angular.element(document).ready() method for attaching callback method.And on that callback we can call which ever method we want to execute.

.controller('YourController',
['$scope',
function ($scope) {

$scope.yourMethod = function(){
//Give definition to your function.
alert("Inside yourMethod");
}

angular.element(document).ready(function () {
$scope.yourMethod();
});

}]);

One more thing to note that as we are dealing with modules so in some cases it is possible that instead of document we want to call this method on load of module.
For such case you can replace :-

angular.element(document).ready(function () {
$scope.yourMethod();
});

By below code,which is just related to that particular modules.

$scope.$on('$viewContentLoaded', function ($evt, data) {
$scope.yourMethod();
});

Hope This will Help Someone.

Asynchronous Module Definition( i.e. Lazy/Asynchronous Loading) with requirejs

Asynchronous module definition (AMD) is a JavaScript specification that defines an API for defining code modules and their dependencies, and loading them asynchronously if desired.Below are benefits of AMD:-

1)Application is broken in multiple smaller files,so only needed files are loaded at time.
2)AMD allows developers to define dependencies which must be loaded before module is executed.
3)If you are working with big applications then by module you have to work one by one and you don’t have to
remember the logic of entire application at one time.
4)AMD specification is implemented by Dojo Toolkit, RequireJS.

We will be see practically why and when to use this.

Lets create a use case.
1)In a family there is one child and his mother and father.
2)One question is asked to child which he have to reply in just true or false.
3)Child will reply after asking to his mother and father.
4)For replying to child his father will also ask to his mother.

Now lets code for this small scenario.

Create folder with name ‘js’ in application and create all .js files inside this folder. Now lets create classes for this use case one by one :-
1)index.html:-

<!doctype html>
<html>
<head>
<meta charset="utf-8">
<title>Demo For AMD with requirejs</title>
</head>
<body>
<h2>For detail info Check console and js files for watching details.</h2>


<!-- Script no. 1 -->
<script src="js/mother.js"></script> 

<!-- Script no. 2 -->   
<script src="js/father.js"></script>

<!-- Script no. 3 -->  
<script src="js/boy.js"></script>

<!-- Script no. 4 -->
<script src="js/main.js"></script>

<script data-main="js/main" ></script>

</body>
</html>

2)main.js:-

var result = askToBoy();
if(result){
alert("Your Question is answered as " + result);
}

3)boy.js:-

function askToBoy()
{
console.log("Function : askToBoy()");

var fatherResponse = fatherReply();
if(fatherResponse){
var motherResponse = motherReply();
if(motherResponse){
return true;
}
else{
return false;
}
}
else{
return false;
}
}

4)father.js:-

function fatherReply(){
"use strict";
console.log("Function : fatherReply()");

var fatherResponse = wifeReply();
return fatherResponse;
}

5)mother.js:-

function motherReply(){
console.log("Function : motherReply()");

myRepsonse = true;
return myRepsonse;
}

function wifeReply(){
console.log("Function : wifeReply");

myRepsonse = true;
return myRepsonse;
}

Now run the application it will give you “true” as result in alert.
Now in index.html just shift line :-

<script src="js/main.js"></script>

to 1,2 or 3 lines up.Now you will see that this is not running no alert is coming and giving exception in code(check console).
Here you can see that there is no way of knowing dependency of knowing any class.For a big application we can not rely on this style.And if with a lot of caring we will code then also it will be loading a lot of files and hence the performance will be decrease.

Now Lets start with AMD style.
First of all get the require.js file from link below :-
http://requirejs.org/docs/download.html#requirejs

Create folder with name ‘js’ in application and create all .js files inside this folder including downloaded ‘require.js’. Now Create classes one by one as below:-

1)index.html:-

<!doctype html>
<html>
<head>
<meta charset="utf-8">
<title>Asynchronous Module Definition( i.e. Lazy/Asynchronous loading) with requireJS </title>
</head>
<body>

<h2>Asynchronous Module Definition( i.e. Lazy/Asynchronous loading) with requireJS </h2>
<h2>For detail info Check Console.</h2>

<script data-main="js/main" src="js/require.js"></script>
</body>
</html>

2)main.js:-

require(["boy"],function(boy){
"use strict";
var result =  boy.askToBoy();

alert("Response to your question is "+ result);

});

3)boy.js:-

define(["father","mother",console], function(father,mother) {
"use strict";
console.log("boy class.");

return {
askToBoy : function() {
var boyResponse = father.fatherReply() && mother.motherReply();
return boyResponse;
}
};
});

4)father.js:-

define(["mother",console], function(mother) {
"use strict";
console.log("class father");

return {
fatherReply: function() {
var wifeResponse = mother.wifeReply();
return wifeResponse;
}
};
});

5)mother.js:-

define([console],function() {
"use strict";
return {
motherReply: function() {
console.log("mother class's motherReply function.");
return true;
},

wifeReply:function() {
console.log("mother class's wifeReply function.");
return true;
}
};
});

Now you can see that using ‘requirejs’ for AMD style application, we are able to provide the dependency of each and every module at it’s inner level.So as the classes will be require by application those will be served accordingly.And hence the load of application will be also less and we will able to optimize performance also.

This approach will be provide much better result as much as big application you will be having.

Hope this will helpful for someone.
Validations in AngularJS

AngularJS provides nice implementation for validation mechanism at it core.Below are the properies of various html controls with Angularjs which one must need to be know and understand:-

$valid Content of the field is valid.
$invalid Content of the field is invalid.
$dirty You have interacted with field.
$pristine You have not interacted with the field.
$touched You have touched the field.

Also there are multiple built-in validations tokens from angular like:-

max
maxlength
min
minlength
required

and many more.

For the complete reference please visit url :-

https://docs.angularjs.org/api/ng/type/form.FormController

Please note that ‘novalidate’ attribute for the form it is used for disabling any default browser validation.

Now attaching code snippet for the sample application,which will make things more clear.

<!DOCTYPE html>
<html>
<head>
    <script src="https://code.angularjs.org/1.4.8/angular.js"></script>
    <link href="http://maxcdn.bootstrapcdn.com/bootstrap/3.3.5/css/bootstrap.min.css" rel="stylesheet">
    <script src="js/app.js"></script>
</head>

<h2 align="center">Validation Sample</h2>

<body ng-app="registrationApp" ng-controller="registrationController" style="padding-top: 40px">
	
<div class="container">
    <form name="registrationForm" ng-submit="onSubmitClick(registrationForm.$valid)" novalidate>

        <div class="form-group" ng-class="{ 'has-error' : registrationForm.name.$invalid && !registrationForm.name.$pristine }">
            <label>Enter Name <span style="color: #FF0000">*</span></label>
            <input type="text" name="name" class="form-control" ng-model="user.name" required>
            <p ng-show="registrationForm.name.$error.required" class="help-block">Name is required.</p>
        </div>
        
        <div class="form-group" ng-class="{ 'has-error' : registrationForm.userName.$invalid && !registrationForm.userName.$pristine }">
            <label>Enter User Name <span style="color: #FF0000">*</span></label>
            <input type="text" name="userName" class="form-control" ng-model="user.userName" required ng-minlength="4" ng-maxlength="8">
            <p ng-show="registrationForm.userName.$error.required" class="help-block">User Name is required.</p>
            <p ng-show="registrationForm.userName.$error.minlength" class="help-block">userName should have atleast 4 characters.</p>
            <p ng-show="registrationForm.userName.$error.maxlength" class="help-block">userName can have maximum 8 characters.</p>
        </div>
            
        <div class="form-group" ng-class="{ 'has-error' : registrationForm.email.$invalid && !registrationForm.email.$pristine }">
            <label>Enter Email Id <span style="color: #FF0000">*</span></label>
            <input type="email" name="email" class="form-control" ng-model="user.email" required>
             <p ng-show="registrationForm.email.$error.required" class="help-block">Email is required.</p>
            <p ng-show="!registrationForm.email.$error.required && registrationForm.email.$invalid && !registrationForm.email.$pristine" class="help-block">Email is not in a valid Format.</p>
        </div>
        
        <button type="submit" class="btn btn-default" ng-disabled="registrationForm.name.$invalid || registrationForm.userName.$invalid ||registrationForm.email.$invalid">Submit</button>
    </form>
    
   <h1 align="center">Form's Item Status Table</h1>

     <div class="row" align="middle">
        <div class="col-xs-4">
            <h2>Name</h2>
            <table class="table table-bordered">
                <tbody align="center">
                    <tr>
                        <td>Valid = <span ng-bind="registrationForm.name.$valid"></span></td>
                    </tr>
                    <tr>
                        <td>Pristine = <span ng-bind="registrationForm.name.$pristine"></span></td>
                    </tr>
                    <tr>
                        <td>Dirty = <span ng-bind="registrationForm.name.$dirty"></span></td>
                    </tr>
                    <tr>
                        <td>Touched = <span ng-bind="registrationForm.name.$touched"></span></td>
                    </tr>
                </tbody>
            </table>
        </div>
        <div class="col-xs-4">
            <h2>User Name</h2>
            <table class="table table-bordered">
                <tbody align="center">
                	<tr>
                        <td>Valid = <span ng-bind="registrationForm.userName.$valid"></span></td>
                    </tr>
                    <tr>
                        <td>Pristine = <span ng-bind="registrationForm.userName.$pristine"></span></td>
                    </tr>
                    <tr>
                        <td>Dirty = <span ng-bind="registrationForm.userName.$dirty"></span></td>
                    </tr>
                    <tr>
                        <td>Touched = <span ng-bind="registrationForm.userName.$touched"></span></td>
                    </tr>
                </tbody>
            </table>
        </div>
        <div class="col-xs-4">
            <h2>Email</h2>
            <table class="table table-bordered">
                <tbody align="center">
                    <tr>
                        <td>Valid = <span ng-bind="registrationForm.email.$valid"></span></td>
                    </tr>
                    <tr>
                        <td>Pristine = <span ng-bind="registrationForm.email.$pristine"></span></td>
                    </tr>
                    <tr>
                        <td>Dirty = <span ng-bind="registrationForm.email.$dirty"></span></td>
                    </tr>
                    <tr>
                        <td>Touched = <span ng-bind="registrationForm.email.$touched"></span></td>
                    </tr>
                </tbody>
            </table>
        </div>
    </div>
    
    
    <h2 id="nameLbl"></h2>
    <h2 id="userNameLbl"></h2>
    <h2 id="emailLbl"></h2>
    <h3 id="msgLbl"></h3>
</div>
</body>
</html>

Below is .js which is referenced in above code.

var ngApp = angular.module('registrationApp', []);
ngApp.controller('registrationController', function($scope) {
	
	//Defaut form will be having the initial values of multiple fields.This will be helpful for editing operation in forms.		
	var defaultForm = {
              name : "",
              userName : "",
              email: """
          };
				
	$scope.onSubmitClick = function(isValid) {
		//Check validity of Your Form.
		if (isValid) { 
			document.getElementById("nameLbl").innerHTML = "Name = " + $scope.user.name;
			document.getElementById("userNameLbl").innerHTML = "UserName = " + $scope.user.userName;
			document.getElementById("emailLbl").innerHTML = "Email = " + $scope.user.email;
			document.getElementById("msgLbl").innerHTML = "Send Data to Server From Here.Now Clearing the form and setting it to it's intial state.";
			
			//Restore form to it's inital state. 
			$scope.registrationForm.$setPristine();
            $scope.user = angular.copy(defaultForm); 
		}
	};

});

Hope this will help someone.

npm ERR! Windows_NT 6.1.7601 Error with nodejs Command

You may found this error when you are trying to install any tool based on nodejs.
The reason for this is that you are not able to connect to the repo from your machine due to any proxy or firewall.
But the another thing which I want to mention for my case was that I was not running the command prompt as Administrator.
Once I run same command with Administrator right, after opening command prompt it worked perfectly.

Hope this can help full for someone.

Why NodeJS For Client Side Java Script Developers ?

Most of the tech community is aware that nodejs for the server side development with java-script but very less are aware that Nodejs is one of important technology for client side developers. The reason for this is that multiple client side develpment tools runs on this. Bower, Gulp, Grant etc. are some of those. So Client side java script developer must need nodejs on his machine as these tools are on top of nodejs.

You can get nodejs from the link below:-

https://nodejs.org/en/

Hope this will help someone.

Creating Responsive Web Page Using Bootstrap CSS 3

The basic of bootstrap css is it’s grid system.According to it you can place different divs as columns inside a row div.
In Grid system full row’s width is considered as 12 unit.Now you have to decide that how much you want to allocate for a column out of these 12.
Device types are represented as below:-
a)xs For Phones
b)sm For Tablets
c)md For Desktops
d)lg For larger Desktops

So style class for one column can be written as ‘col-Device_Type-Width_Of_Column_Out_Of_12’.
For examle:-
col-xs-12 Means it will take full row width on phones screen.
col-sm-6 Means it will take half of full row width on tablets.
col-md-3 Means it will take 1/4 of full row width on Desktop.

Now attaching small sample code snippet for this sample.In code we have:-
1)Added bootstrap css,bootstrap js and jquery.
2)Added ‘container’ class which is for responsive fixed width container.
3)Added ‘img-responsive’ and ‘img-rounded’ classes for images to be responsive.

	<!DOCTYPE HTML>
	<html>
	<head>
		<meta name="viewport" content="width=device-width, initial-scale=1">
		
		<link rel="stylesheet" href="http://maxcdn.bootstrapcdn.com/bootstrap/3.3.5/css/bootstrap.min.css">
		<script src="https://ajax.googleapis.com/ajax/libs/jquery/1.11.3/jquery.min.js"></script>
		<script src="http://maxcdn.bootstrapcdn.com/bootstrap/3.3.5/js/bootstrap.min.js"></script>
	</head>
	<body>
			
		<div class="container" style="background-color:#DDDDDD;top: 100px" >	
			<div class="jumbotron" align="center">
		    	<h2>Responsive Web Page Using Bootstrap CSS 3</h2>
		    	<p>Resize this Page To Multiple Dimensions Or Check This Sample On Different Devices.</p>
		    </div>
		    
			<div class="row" align="center" style="background-color:#CCCCCC">
				<div class="col-xs-12  col-sm-6  col-md-3" align="center" style="background-color:#FF0000">Div 1</div>
				<div class="col-xs-12  col-sm-6  col-md-3" align="center" style="background-color:#00FF00">Div 2</div>
				<div class="col-xs-12  col-sm-6  col-md-3" align="center" style="background-color:#0000FF">Div 3</div>
				<div class="col-xs-12  col-sm-6  col-md-3" align="center" style="background-color:#FFFF00">Div 4</div>
			</div>
			
			<br/>
			
			<div class="row" align="center"  >
				<div class="col-xs-12  col-sm-4  col-md-3" align="center">
					<img src="img_320X240.jpg" class="img-responsive img-rounded"><img/>
				</div>
				<div class="col-xs-12  col-sm-4  col-md-3" align="center">
					<img src="img_320X240.jpg" class="img-responsive img-rounded"><img/>
				</div>
				<div class="col-xs-12  col-sm-4  col-md-3" align="center">
					<img src="img_320X240.jpg" class="img-responsive img-rounded"><img/>
				</div>
				<div class="col-xs-12  col-sm-4  col-md-3" align="center">
					<img src="img_320X240.jpg" class="img-responsive img-rounded"><img/>
				</div>
			</div>
			
		</div>
					 
	</body>
</html>

Hope this will help someone.

Creating Responsive Single Page Application with Angular JS

In this sample we will be just creating a sample structure with very simple features. You have gone through multiple samples, but trying to put things together for creating at least a small structure of multiple components. Let’s consider a case that one will be just having some static pages and header and footer for application.
So we can say that we will be having multiple tabs in application and will also making a tab, which will having drop-down menus. In this sample we will be using controllers just to show how those are written. Will not creating any modules here.Things will be help full for later stages with this sample. Also this sample will be more helpful for beginners and designers mainly. We are using bootstrap css for the responsive design.

Let’s first create index.html of application as below:-

<!DOCTYPE html>
<html>
<head>
<title>SPA with Angular</title>
<link rel="stylesheet" href="//maxcdn.bootstrapcdn.com/bootstrap/3.3.5/css/bootstrap.min.css">
</head>

<!-- Add jQuery and Bootstrap. -->
<script src="//ajax.googleapis.com/ajax/libs/jquery/1.11.0/jquery.min.js"></script>
<script src="//maxcdn.bootstrapcdn.com/bootstrap/3.2.0/js/bootstrap.min.js"></script>

<!-- Add angularjs -->
<script src="//ajax.googleapis.com/ajax/libs/angularjs/1.4.7/angular.min.js"></script>
<script src="//ajax.googleapis.com/ajax/libs/angularjs/1.4.7/angular-route.min.js"></script>

<!-- Add application's JS File -->
<script src="js/app.js"></script>

<body ng-app="spaWebApp">
<div ng-include='"header.html"'></div>
<div ng-view=""></div>
<div ng-include='"footer.html"'></div>
</body>

</html>

As you can see that page have below main parts:-
1) Adding jQuery,Bootstrap and angular references.
2) Adding ‘app.js’
3) Added three divs for header,footer and content of application.

Now below is code of app.js:-

var app = angular.module('spaWebApp', [
'ngRoute'
]);

/**
* Configure the Routes.
*/
app.config(['$routeProvider', function ($routeProvider) {
$routeProvider
// Home.
.when("/", {templateUrl: "pages/home.html", controller: "HomeController"})

// Tabs.
.when("/tab1", {templateUrl: "pages/tab1Ui.html", controller: "TabController"})
.when("/tab2", {templateUrl: "pages/tab2Ui.html", controller: "TabController"})
.when("/tab3", {templateUrl: "pages/tab3Ui.html", controller: "TabController"})

// Menu Items.
.when("/tab4/menu1", {templateUrl: "pages/tab4menu1Ui.html", controller: "MenuController"})
.when("/tab4/menu2", {templateUrl: "pages/tab4menu2Ui.html", controller: "MenuController"})

//page not Found.
.otherwise("/404", {templateUrl: "pages/errorpage.html", controller: "PNFController"});
}]);

app.controller('HomeController', function (/* $scope, $location, $http */) {
document.getElementById("msglbl").innerHTML = "HomeController Working Fine.";
});

app.controller('TabController', function (/* $scope, $location, $http */) {
document.getElementById("msglbl").innerHTML = "TabController Working Fine.";
});

app.controller('MenuController', function (/* $scope, $location, $http */) {
document.getElementById("msglbl").innerHTML = "MenuController Working Fine.";
});

app.controller('PNFController', function (/* $scope, $location, $http */) {
document.getElementById("msglbl").innerHTML = "PNFController Working Fine.";
});

For this sample you don’t need to focus a lot on multiple controllers.But you can see how controllers can be associated with multiple parts of application.In this sample we are just changing the text of footer as via multiple controllers.

As per above code you will need to create header and footer templates and multiple pages inside ‘pages’ folder.Instead of providing code of multiple pages just adding sample html for ‘home.html’.You can create all pages as per your requirement.Below is structure for ‘home.html’:-

<div class="container" >
<div class="jumbotron" style="width: 100%;height: 100%" align="center">
This is Home page.
</div>
</div>

Here is ‘header.html’:-

<nav class="navbar navbar-inverse navbar-fixed-top" role="navigation">
<div class="container">
<div class="navbar-header">
<button type="button" class="navbar-toggle" data-toggle="collapse" data-target=".navbar-ex1-collapse">
<span class="sr-only">Toggle navigation</span>
<span class="icon-bar"></span>
</button>
</div>
<div class="collapse navbar-collapse navbar-ex1-collapse">
<ul class="nav navbar-nav navbar-right">
<li><a href="#/">Home</a></li>
<li><a href="#/tab1">Tab1</a></li>
<li><a href="#/tab2">Tab2</a></li>
<li><a href="#/tab3">Tab3</a></li>
<li class="dropdown">
<a class="dropdown-toggle" data-toggle="dropdown">Tab4(with Menus) <b class="caret"></b></a>
<ul class="dropdown-menu">
<li><a href="#/tab4/menu1">Menu1</a></li>
<li><a href="#/tab4/menu2">Menu2</a></li>
</ul>
</li>
</ul>
</div>
</div>
</nav>

and the last one is ‘footer.html’:-

<footer>
<div align="center">
<p>This is your footter.</p>
<p id="msglbl" style="color: #0000ff"></p>
</div>
</footer>

Except these files you will see some pages referenced in app.js. Those are simple pages lot like similar to ‘home.html’.
You can design them later according to your needs later on.

Hope this will be useful for someone.

Drag and Drop Feature in HTML5 Using jQuery

As in last post we have done the drag and drop feature in html5 using Java Script now we will be doing same exercise using jQuery.
This time let’s try to make the application bit realistic and just think that instead of dragging and dropping one item we are having multiple items, which will be real word scenario in your day by day activity. Let suppose we are having two div one is source, we are calling it ‘productlist’ in our case. The another one is destination, terming it as ‘userselectedlist’.
Adding code snippet below for this. You can see how easily this can be achieved using jQuery.

<!DOCTYPE HTML>
<html>
<head>
    <title>Drag and Drop with jQuery</title>
    <h2>Drag and Drop with jQuery</h2>
</head>

      <style>
        img
        {
            height: 120px;
            width:  120px;
            margin: 5px;
        }
        .draggable
        {
            filter: alpha(opacity=80);
            opacity: 0.8;
        }
        .dropped
        {
            position: static !important;
        }
       #productlist, #userselectedlist
        {
            border: 5px solid #888888;
            padding: 10px;
            min-height: 140px;
            width: 540px;
        }
   </style>
    
<script type="text/javascript" src="//ajax.googleapis.com/ajax/libs/jquery/1.8.3/jquery.min.js"></script>
<script src="//code.jquery.com/ui/1.8.24/jquery-ui.min.js" type="text/javascript"></script>


 <script type="text/javascript">
   $(function () {
    $("#productlist img").draggable({
        revert: "invalid",
        refreshPositions: true,
        drag: function (event, ui) {
            ui.helper.addClass("draggable");
        },
        stop: function (event, ui) {
            ui.helper.removeClass("draggable");
            var image = this.src.split("/")[this.src.split("/").length - 1];
            if ($.ui.ddmanager.drop(ui.helper.data("draggable"), event)) {
                document.getElementById("msglbl").innerHTML  = image + " dropped successfully.";
            }
            else {
                document.getElementById("msglbl").innerHTML  = "Unable to drop " + image;
            }
        }
    });
    $("#userselectedlist").droppable({
        drop: function (event, ui) {
            if ($("#userselectedlist img").length == 0) {
                $("#userselectedlist").html("");
            }
            ui.draggable.addClass("dropped");
            $("#userselectedlist").append(ui.draggable);
        }
    });
});
</script>

<body>
    <div id="productlist" align="center">
    	<img src="images/product1.jpg"/>
    	<img src="images/product2.jpg"/>
    	<img src="images/product3.jpg"/>
    	<img src="images/product4.jpg"/>
    	<img src="images/product5.jpg"/>
    	<img src="images/product6.jpg"/>
    	<img src="images/product7.jpg"/>
    	<img src="images/product8.jpg"/>
    	<img src="images/product9.jpg"/>
    </div>
    <br>
   <div id="userselectedlist" align="center">
    	<h2> Add Your Products Here.</h2>
    </div>
	<h4 id="msglbl">  You Have Not Selected Any Product. </h4>
</body>
</html> 

Hope this will help someone.

Drag and Drop Feature in HTML5

As all of you have listen about one of excellent feature of HTML5 i.e. drag and drop feature. Let’s elaborate it with sample application. In this requirement there are two components one is destination in which we will drop the item and another one is source i.e. the item which we are going to drag and drop in destination. In our sample we will be just taking an image and will be dropping this to a div. We will be implementing it as:-
1) Destination: – Taking a div for this purpose and setting id=”dropContainer”.
We will be using two events for this:-
a) ondragover
b) ondrop
2) Source: – Taking an image for this and setting id=”draggableimage”.
Only one event for source is required in this sample i.e. ‘ondragstart’.
Another thing to do with source is setting draggable=”true”.

That’s all and we are ready with sample application with drag and drop feature. Adding code snippet for this sample below.

<!DOCTYPE HTML>
<html>
<head>
    <title>Drag and Drop Sample</title>
   <h2>Sample Application For Drag and Drop (Use Mouse to Drag Image into Box)</h2>
</head>

<script>
	function drophandler(event) {
		event.preventDefault();
		var data = event.dataTransfer.getData("text");
		event.target.appendChild(document.getElementById(data));
		document.getElementById("msg").style.visibility = "hidden";
	}
	
	function dragoverhandler(event) {
		event.preventDefault();
	}
	
	function dragstarthandler(event) {
		event.dataTransfer.setData("text", event.target.id);
	}
</script>

	<body>
		<div align="center">
			<div id="dropContainer" style="width: 300px; height: 300px; border: 8px solid #888888;" align="center" ondragover="dragoverhandler(event)" ondrop="drophandler(event)" >
				<h3 id="msg">Drop Your Image Here.</h3>
			</div>
			<br>
			<img id="draggableimage" width="200" height="200" src="img.jpg" draggable="true" ondragstart="dragstarthandler(event)"/>
		</div>	
	</body>
	
</html>	

Hope this will help someone.

First AngularJS Sample Application

We will be creating our first angularJS application as very basic sample app.As AngularJS is a javascript framework and written in javascript,so it is distributed as a javascript file.We can simply add it inside     ‘<script>’ tags.

Now as AngularJS extends HTML with ng-directives.For our this sample we will be using below 4 angular directives:-
1)ng-app :- which defines an AngularJS application.
2)ng-model :-which binds value of HTML control e.g. ‘input’ to application’s data.
3)ng-bind :- this directive binds application’s data to HTML view.
4)ng-init :- this directive is used to initialize AngularJS application variables.

Attaching code for the this application and we are ready to go.

<!DOCTYPE html>
<html>
<script src="http://ajax.googleapis.com/ajax/libs/angularjs/1.4.7/angular.min.js"></script>
<body>
  
<div ng-app="" ng-init="modelname='David'">
 
  <p>Enter Name Here: <input type="text" ng-model="modelname"></p>
  <p ng-bind="modelname"></p>
 
 
</div> 
</body>
</html>

Hope this will help someone.

What and Why AngularJS ?

As all of us have already listen the most famous word “HTML5”,which is termed as most revolutionary over the internet.HTML5 is next generation of HTML which was earlier on the version 4 i.e. HTML4. Now if you will go through comparing HTML 4 to HTML 5 then you are not going to found there a lot revolutionary. We can say that whatever new is there is just a combination of HTML5, CSS3, and Java Script.This combination can be enough for the static websites. But even after using these we are still far enough for the web applications.

As per Wikipedia:-

AngularJS (commonly referred to as “Angular” or “Angular.js”) is an open-source web application framework mainly maintained by Google and by a community of individual developers and corporations to address many of the challenges encountered in developing single-page applications. It aims to simplify both the development and the testing of such applications by providing a framework for client-side model–view–controller (MVC) and model–view–viewmodel (MVVM) architectures, along with components commonly used in rich Internet applications.

So we can say that AngularJS is framework for achieving:-

1) Single Page Applications

2) Client Side ‘Model View Controller’ and ‘Model-View ViewModel’

3) Rich Internet Applications

Also the goals of AngularJS are defined on Wikipedia:-

  •     to decouple DOM manipulation from application logic. The difficulty of this is dramatically affected by the way the code is structured.
  •    to decouple the client side of an application from the server side. This allows development work to progress in parallel, and allows for reuse of both sides.
  •    to provide structure for the journey of building an application: from designing the UI, through writing the business logic, to testing.

So for today’s internet AngularJS is one of the important part, as above mentioned all items are the crucial of today’s modern web. You will be known about a lot of Java Script

Frameworks and Libraries already. But the way AngularJS is being demanded it seems that it is a skill to be included in your skill set.


Hope this will help someone.